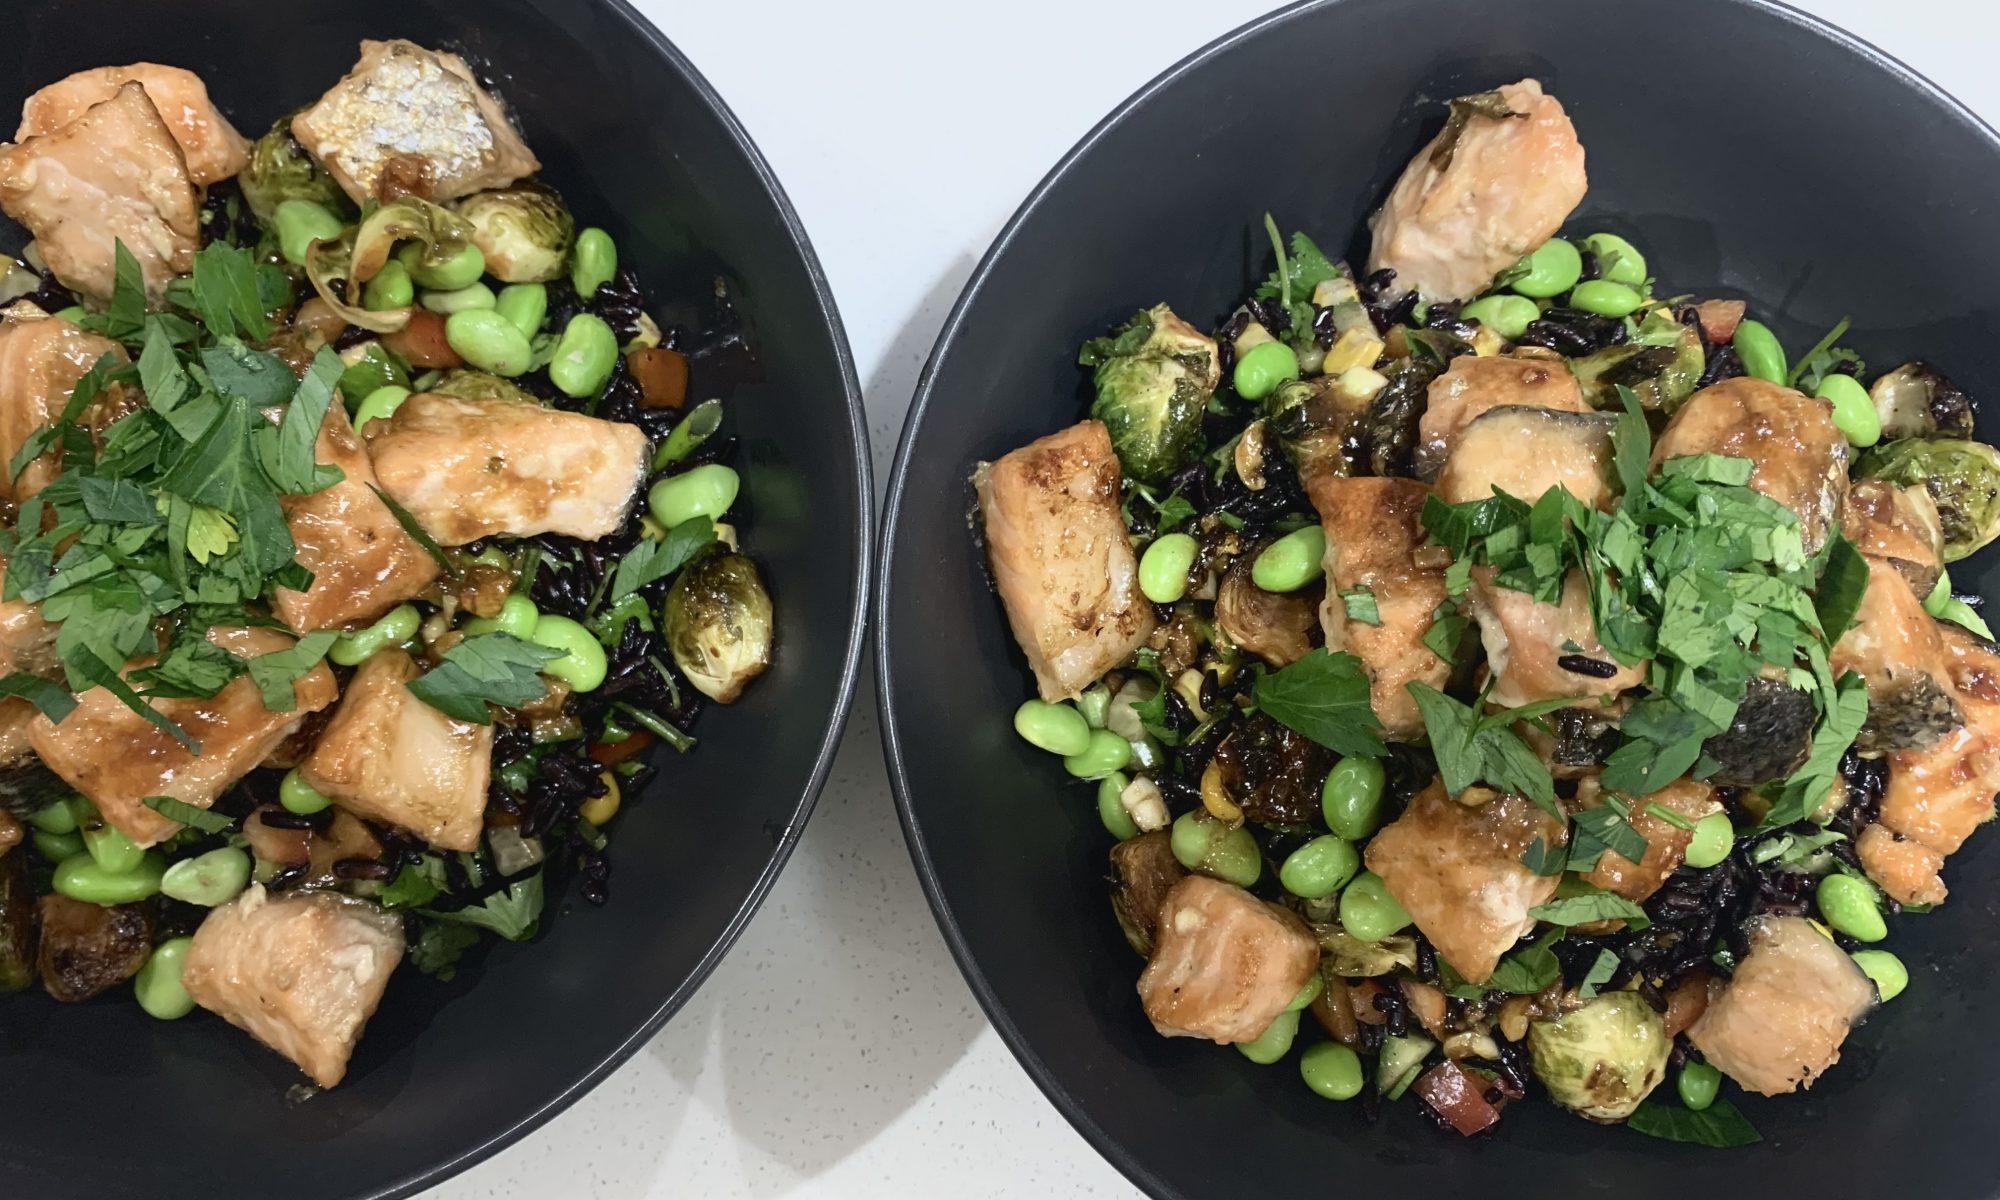
If you haven’t made your own broth (or stock) at home before, well, it’s better late than never! Bone broth in particular is one of the most affordable and nourishing foods you can make at home – literally it will cost you next to nothing for litres of this delicious broth. So stop buying store bought broth now. 🙂
Bone broth is the liquid that is left over after after you simmer meaty bones and connective tissue in water – I love to add additional vegetables, herbs and spices for added flavour and nutrients too. Having your own broth on hand means you have a nutritious and delicious base to soups, stews, sauces, can be enjoyed straight, added into bolognaise, used to cook your rice/quinoa/pasta in – basically anything to add additional nutrients and flavour!
Bone broth and stock are similar – bone broth though is typically simmered for an extensive period of time, and draws more nutrients from the bones. Stocks can be either bone and/or vegetable and not cooked for as long. Either way – it’s time to grab out your big stock pot or slow cooker and get simmering !
(read more on the benefits of bone broth here)
Bone Broth
- Bone broth: Use (ideally organic) knuckle and neck bones, shanks and oxtails. You can also use marrow bones, too. But I find too much marrow creates a greasy / oily broth. Just ask your local butcher! Note: If you roast your bones prior, you will get a richer flavour
- Chicken Broth: Use a whole chicken, chicken feet, the frame of a roasted chicken etc. Basically anything from the chicken. So next time you cook up a roast chook, save those bones!
- 1-2 tbsp Apple Cider Vinegar This helps draw out the nutrients from the bones
- 1 tbsp Black peppercorns
- 2 Bay Leaves
- 1 Garlic bulb slightly crushed
- Any left over vegetables off cuts such as carrots, onion, celery/leaves (optional, not essential) TIP: I save these when I prep dinner and just put in a bag and freeze so I have all the off cuts when I'm ready to make a batch!)
- Enough water to 3/4 fill your pot or to cover your bones
- NOTE: You can really add any flavours / spices to your broth that you like! Just about anything goes!
It's as simple as throwing everything into a stock pot, filling with water that it covers the bones and some. Bring to the boil over medium – high heat and then turn heart down to low.
Simmer, uncovered for at least 8 hours and up to 16 hours. Skim any foam that appears at the surface of the broth over that time.
Once done, strain the broth and discard the bones / vegetables. Be careful the bones will be super hot !
Pop the broth in the fridge over night and remove the excess fat that solidifies on the top. Your cold broth should look like jelly. 🙂
Scoop the broth into jars or containers. I use silicon muffin tray / moulds and pop them in the freezer. Once frozen, I then transfer the frozen moulds into containers and store. That way I have on hand approx 1 cup size of broth anytime I need.
Broth can be stored in the fridge for up to a week (remember it's a meat), but in the freezer for 6mths. But mine definitely doesn't last that long!
Boost your salad game and brighten up your meal (and your day!) with the vibrant colours and flavours of this warm roasted vegetable, chickpea and haloumi salad with candied walnuts. Nutritious, full of flavour, and perfect for leftovers. Great thing with this salad is, the vegetables can be altered based on what you have in the fridge, and haloumi can be subbed for tofu, tempeh (keeping it vegetarian or taking it vegan) or add another protein of your choice. Add this one to your meal rotations, and you will have a delicious lunch or dinner on the menu that’s super easy to prepare.
Roasted Vegetable, Chickpea and Haloumi Salad
Vegetables for roasting of your choice. If you have these pre-roasted, makes dinner prep even more simple!
My favourites (but really any veggies go!):
- 1/2 Butternut Pumpkin, chopped ~2cm pieces
- 1 large Sweet Potato, chopped ~2cm pieces
- 1/4-1/2 Cauliflower, chopped into florets
- 1 Red Onion, quartered length ways
- 1 punnet Cherry Tomatoes
- Olive Oil
- 1 tbsp Dried Oregano (or herb of choice)
Other Ingredients
- 1 large Handful Baby spinach leaves
- 1 small Bunch flat-leave parsley, roughly chopped
- 1 400g can Chickpeas, drained and rinsed
- 250g Haloumi, thickly sliced (you could sub for tofu, tempeh or even a protein of choice etc)
- 1 large Handful Walnuts, slightly chopped
- 1/2 tbsp Honey / rice malt syrup
For the dressing
- 1 tbsp Baby capers, drained, roughly chopped
- 1/2 Lemon – finely grated zest + the juice
- dash Water (as needed)
- 60 ml Olive Oil
- 1 tsp Dijon OR wholegrain mustard
For the roasted Vegetables
Preheat oven to 180deg. Place all the vegetables (excluding tomatoes) evenly on a lined baking tray, drizzle with olive oil and sprinkle with dried herbs and season with S&P. Cook for ~20-30min
Add the tomatoes to the tray, drizzle with oil and return all vegetables to the oven for another ~20min or until potato, pumpkin and cauliflower are tender, onion is golden and tomatoes softened. (note you may need to take out some vegetables before others – so keep an eye on them)
For the Haloumi & Walnuts
Heat frypan and over medium heat throw in the walnuts and drizzle with the honey/rice malt syrup and a sprinkle of salt. Keep an eye on it and toss as needed, but let bubble away until honey/rice malt syrup starts to caramalise.
In the same frypan, cook haloumi on each side until golden.
Pull it all together
Grab a large serving bowl and put everything in, pour over the dressing and toss gently.
Pop it in the middle of your table, grab a bowl and 'serve yourself' and enjoy ! 🙂
A simple ‘throw together’ meal for a help yourself / build your own Bowl that can be prepped ahead of time. Any ingredient can be easily substituted for something else – including the protein you choose, so is an easy go to when you have random veggies left in the fridge. This will be be one of your favourite ‘go to’ meals.
Mexican Burrito Bowl
Prep Time 20 mins
Cook Time 10 mins
Course Main Course
Cuisine Mexican
For the black bean rice
- 1 cup Washed rice of choice
- 2 Garlic cloves minced/chopped
- 1 tbsp Olive Oil
- 1/2-1 tin Black beans
- 2 cups Bone broth / stock and/or water
- 1/2 tin Corn (or fresh corn) (omit if you prefer)
- 2 Spring onions chopped
- 1 tsp ground cumin
- 1/4 Capsicum chopped the same size as beans/corn
- 1/4 tsp Cayenne pepper
For the Mexican Spiced Chicken
- 3-500g Chicken thigh, chopped small (you can easily substitute for any meat / protein here such as beef, tofu, tempeh, salmon – anything goes!)
- 1 tbsp Olive Oil
- 1 tsp Ground Cumin
- 1/2 tsp Cayenne Pepper
- 1/2 tsp Sweet Paprika
- 1 tsp Ground Turmeric
- 1 tsp Ground Coriander
- (don't stress too much about the spices, a little more, a little less, something a little different – no worries! Just ensure you include some 'heat'
For the raw slaw
- Good handful of sliced cabbage
- Good handful of sliced spinach or kale
- 1 Carrot grated
- 1/2 tbsp Good quality mayonnaise
- 1/2 tsp Wholegrain mustard
- 1 tbsp water
Additional bow ingredients
- 1 Chopped tomato
- Equivalent in sliced cucumber
- Cooked snowpeas (optional)
- Chopped avocado
- Greek Yoghurt
- Fresh Coriander
For the Black Bean Rice
In a saucepan over medium heat, heat half the oil then add the garlic and saute for 2-3min
Add the rice and stir through for a further 2min
Add your liquid / broth and cook ~15min (add a little extra liquid if needed / not quite cooked)
Take off the heat and stir through the remaining ingredients, including the remaining oil. Pop into a bowl for serving.
For the Mexican Spiced Chicken
Mix all the spices in a small bowl and then pop in a zip lock bag (or bowl if you prefer) with the chicken and coat thoroughly.
Heat up the oil in a pan to medium- high and drop in the chicken. You want it nice and hot the chicken spread out so it gets a little crispy. Cook until done. Then pop in a bowl for serving
For the raw slaw
Chop up the cabbage, spinach and grate carrot
Mix the dressing ingredients in a bowl or jar
Just prior to serving, pour the dressing over the veggies and mix through, s&p to taste
Additional bowl ingredients
Put the additional ingredients in bowls and then lay everything out on the table for a 'help yourself' / 'build your own' mexican bowl. Any left overs can be enjoyed the next day too! ENJOY !
There’es nothing like a big warm, filling bowl of oats after a hard training session. Load it with all the trimmings and you have a well rounded, post training meal.
Loaded Oats & Chia Porridge
Prep Time 5 mins
Cook Time 10 mins
Saucepan or thermomix
stove top (or thermo)
- 1/2 CUP Organic Rolled Oats
- 1 tbsp Chia Seeds
- 1/2 cup Coconut Milk (or milk of choice)
- 1 cup Boiled Water adjust as needed
- Sprinkle of cinnamon
- TOPPINGS:
- 1 tbsp Yoghurt (I like Greek or coconut)
- 1 tbsp Mix of pepitas and sunflower seeds
- 1 tbsp Nuts of choice (I like almond flakes, pistachios and/or macadamias)
- 1/2 tbsp Flax meal
- 1/2 Banana (optional)
- Small handful of fresh or frozen berries (I like blue berries)
- Coconut flakes
- Peanut Butter
- Chopped Dark Chocolate (optional extra!) 😉
Pop the oats, chia seeds, cinnamon, milk and boiled water into a saucepan and let sit. I like to do this pre-session/in advance so it's ready to cook when I finish. You could also do the night before and pop into the fridge.
When ready to cook, top up with a little extra water and/or milk and cook on low until it's smooth and creamy.
Pour the oats into a bowl and then top with all the toppings. Add a little extra milk.
Sit down and enjoy your warm bowl of goodness!
Keyword post training fuel